PowerTrack Event Manager - Suppression Rules
Suppression Rules
The PowerTrack Event Manager utilizes a set of rules to govern what Events are suppressed and hidden by default to help customers better manage priority incidents across their portfolio based on their individual needs. When a problem is detected on a site, an Event is always created but not every incident will necessitate any form of remediation so the less impactful issues can be suppressed to avoid cluttering your workflow. This document will outline how to access and manage Suppression Rules in the Event Manager as well as detail the default Suppression Rules that the platform utilizes.
Accessing Suppression Rules
- Navigate to the Site you wish to update using the Explorer. (In our case we’ll be navigating to the site
12MW Utility w/ String Inverters)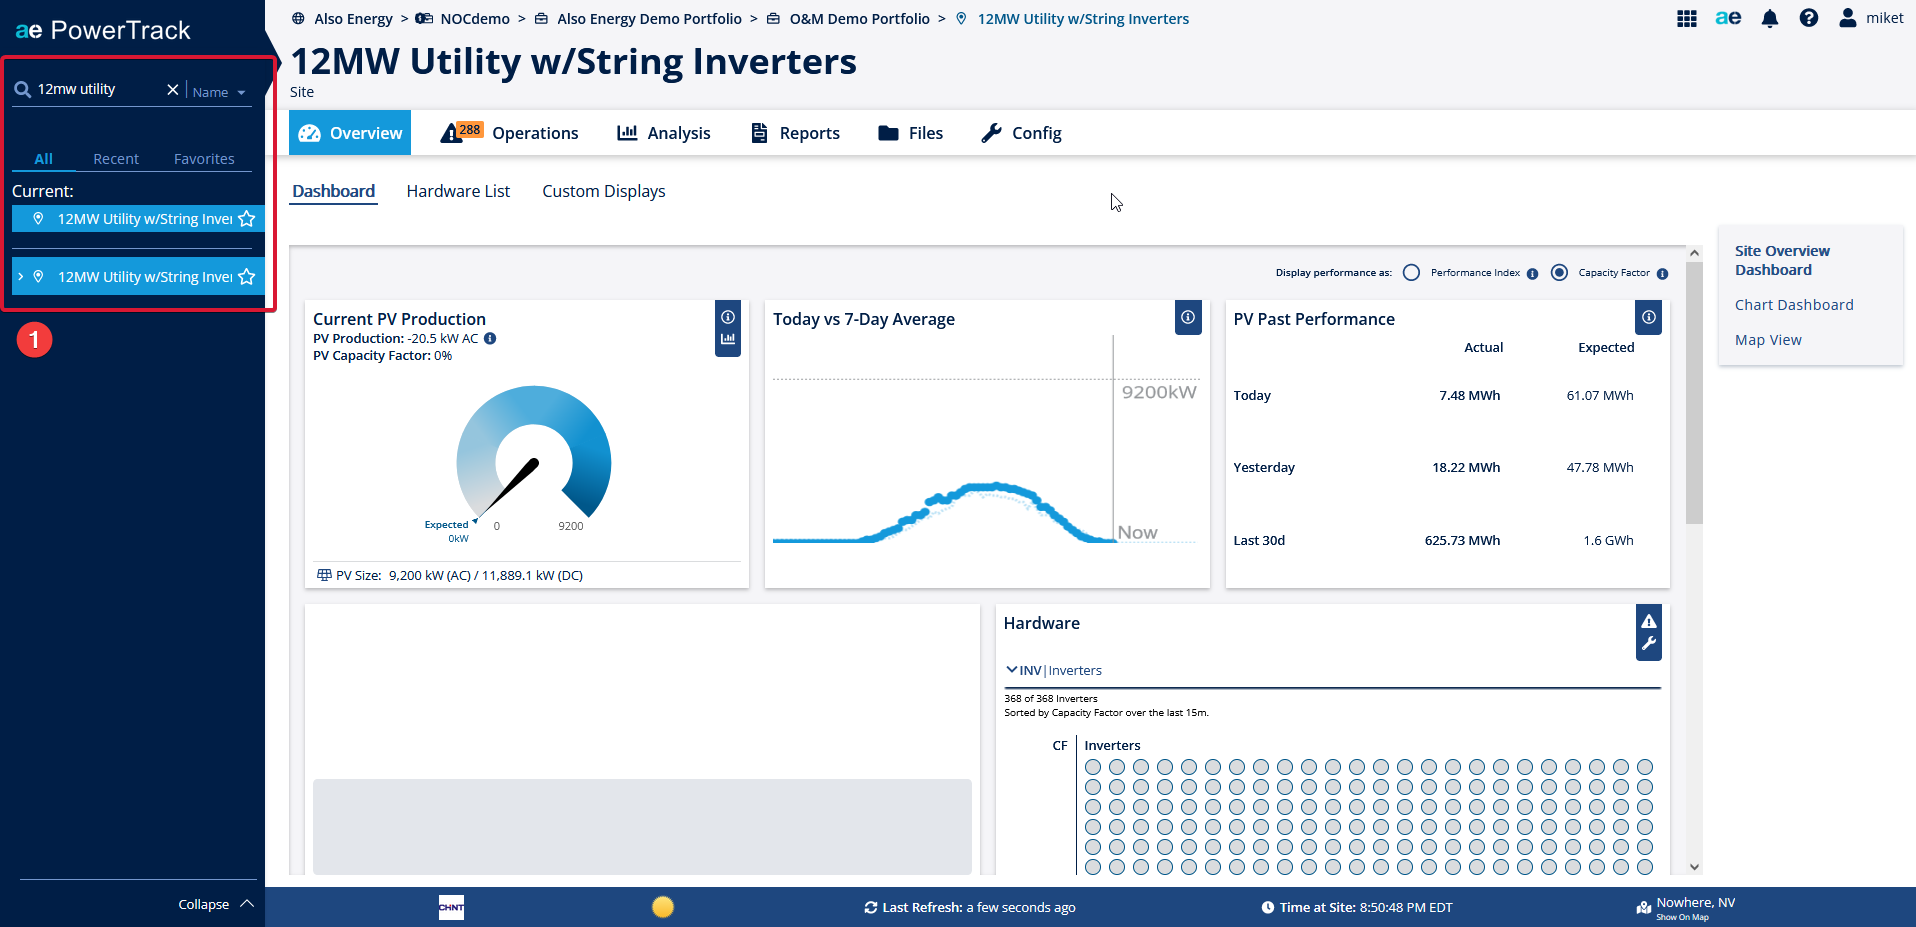
- Click on the
Configtab at the top of the PowerTrack interface. - Click on the
Event Managersub tab at the top of the PowerTrack interface. - Click on the
Suppression Rulespage on the right side of the PowerTrack interface.

Default PowerTrack Suppression Rules
The PowerTrack Event Manager comes pre-configured with multiple Suppression Rules that will help limit the amount of "nuisance alerts" that you see on a day to day basis. Each of these rules uses default values and are applied across your entire portfolio. You may enable/disable and edit the behavior of these rules on a site by site basis, however, to better tune your Event Manager workflow for each individual site. The following rules are pre-configured to help get you started:
- Suppress Warning
- This rule causes all Warning-type Events to be created in a suppressed state, hiding them from the list of active events. By default, all PowerTrack alerts associated with inverter faults are classified as Warning-type Events, so they get suppressed in favor of the Down-type Events that get generated when an inverter's production is detected to be low during daylight hours. Since a Down condition is almost always detected when an inverter is reporting a fault that affects its production, these Events often offer supplemental information and can be safely suppressed while focusing on the simultaneous Down Event. Warning-type Events can also occur without impacting inverter production, but since that is often more of a "nice to know" scenario that does not require remediation, such events can be comfortably suppressed as well.
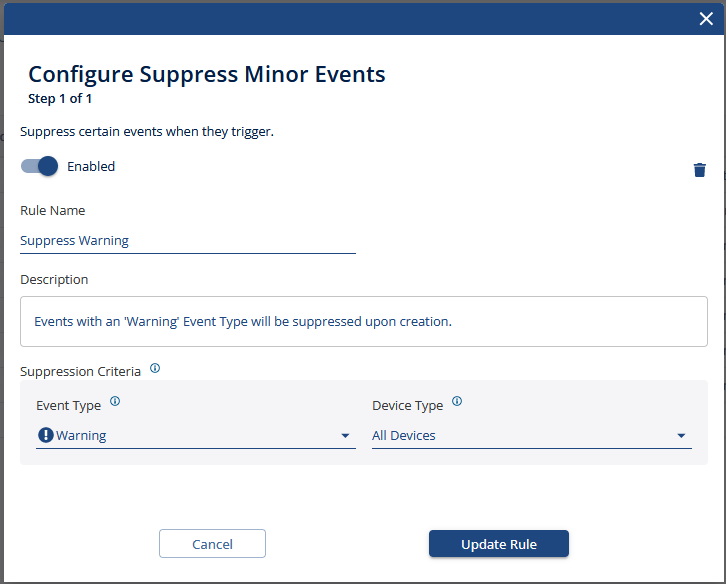
- This rule causes all Warning-type Events to be created in a suppressed state, hiding them from the list of active events. By default, all PowerTrack alerts associated with inverter faults are classified as Warning-type Events, so they get suppressed in favor of the Down-type Events that get generated when an inverter's production is detected to be low during daylight hours. Since a Down condition is almost always detected when an inverter is reporting a fault that affects its production, these Events often offer supplemental information and can be safely suppressed while focusing on the simultaneous Down Event. Warning-type Events can also occur without impacting inverter production, but since that is often more of a "nice to know" scenario that does not require remediation, such events can be comfortably suppressed as well.
- Suppress Information
- This rule causes all Informational-type Events to be created in a suppressed state, hiding them from the list of active events. By default, all PowerTrack alerts that are not associated with inverter faults are classified as Informational-type Events, so they get suppressed. Informational-type Events are often indicators of something not operating optimally, but causing little-to-no production impact so can be safely de-prioritized while more pressing Events are acted upon. If you have any PowerTrack alerts that you would like to classify with higher criticality than Informational, it is recommended to adjust the Event Type of the associated Event Trigger in order to track Events generated by that specific alert, rather than disable this rule as a whole.
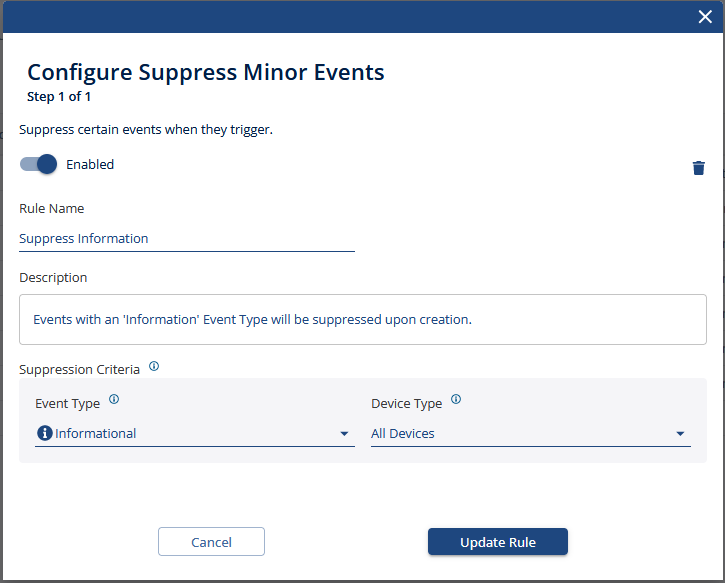
- This rule causes all Informational-type Events to be created in a suppressed state, hiding them from the list of active events. By default, all PowerTrack alerts that are not associated with inverter faults are classified as Informational-type Events, so they get suppressed. Informational-type Events are often indicators of something not operating optimally, but causing little-to-no production impact so can be safely de-prioritized while more pressing Events are acted upon. If you have any PowerTrack alerts that you would like to classify with higher criticality than Informational, it is recommended to adjust the Event Type of the associated Event Trigger in order to track Events generated by that specific alert, rather than disable this rule as a whole.
- Initial Communication
- This rule establishes a "waiting period" where all device-level communication Events are suppressed for 30 minutes to determine if there is a larger aggregate communication Event (detailed below) occurring before being actively displayed. Often times sites have multiple data upload streams and this holding period allows us to properly identify if there is a problem at the device, data logger, or site level before notifying you. If a single device stops communicating, we would only want to notify you of that device-level communication issue. If all of the devices monitored by a single data logger stop communicating, we would want to notify you that there was an issue with the logger itself, rather than with every individual device it is responsible for monitoring. If a variety of devices across the 3 loggers stop communicating, we may want to notify you that there is a large-scale communication problem on your site that doesn't appear to be localized to a single upload stream. If all devices stop communicating, then we would want to notify you that there was a site-level outage rather than a large number of individual device communication issues.
By utilizing this rule, it gives us the time needed to more accurately identify where on the site the communication problem is occurring. If you disable this rule, then you are essentially opting to receive strictly device-level communication Events, which can be a large slowdown in your workflow. Increasing the 30 minute threshold gives a greater time period to identify aggregate communication events, so rolling communication outages can be properly classified, but causes device-level communication Events to remain suppressed longer than they strictly need to be. Decreasing the 30 minute threshold gives greater visibility into device-level Communication Events as they occur, but may lead to a larger number of active device-level communication Events and fewer aggregated site or data logger level events.
Example: Assume your site has 4 data loggers that each monitor 25 different devices. Every data logger uploads independently of the others.
If a single device stops communicating, a device-level communication Event would be created, but suppressed for 30 minutes before being displayed to the user. In this scenario, only 1 Event would be created and it would be unsuppressed after the 30 minute waiting period. (Possible scenario: The RS-485 wires to a weather station become loose over time and break connectivity to the data logger.)If all 25 of the devices monitored by a single data logger stop communicating but the data logger itself is still uploading, then 25 device-level communication Events would be created, but they would all be suppressed. Since all devices on a single logger had simultaneously active communication Events, a Data Logger Communication Event would be created. In this scenario, 26 total Events would be created, but only 1 would be visible to the user while 25 remained suppressed. (Possible scenario: The modbus lines between the data logger and the chain of inverters became disconnected when a squirrel climbed up the data enclosure conduit.)
If 20 devices on each logger stopped communicating, but a few devices were still uploading on each data stream, then 80 different device-level Communication Events would be created, but they would all be suppressed. Since a sufficient number of devices had portrayed simultaneous communication issues, a Partial Site Communication Event would be created, suppressing the others. In this scenario, 81 total Events would be created, but only 1 would be visible to the user while 80 remain suppressed. Once enough devices start uploading again, the Partial Site Communication Event would resolve, and any individual devices that were still failing to communicate would have their associated device-level communication Events unsuppressed. (Possible scenario: Data loggers directly monitor production meters and weather stations via RS-485 wired connections but utilize a radio relay to monitor inverters that are installed 200 meters away and the radio goes out.)
If all 100 of the devices on site plus the 4 data loggers all stopped communicating, then we are no longer receiving data from anything on the site. 104 separate device-level communication events would be created, but since they all occurred within the 30 minute holding period, they would all be suppressed and a site-level communication Event would be created. In this scenario, 105 total Events would be created, but only 1 would be visible to the user while 104 remained suppressed. Once some devices start uploading again, the Site Communication Event would resolve, and any individual devices that were still failing to communicate would have their associated device-level communication Events unsuppressed. (Possible scenario: The cell modem providing a site's internet connection goes down, causing all upload traffic from the site to fail.)
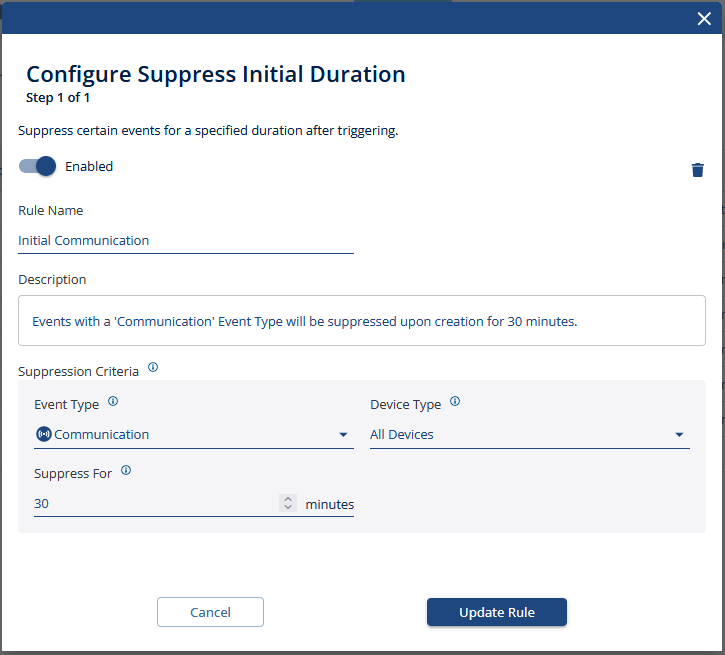
- This rule establishes a "waiting period" where all device-level communication Events are suppressed for 30 minutes to determine if there is a larger aggregate communication Event (detailed below) occurring before being actively displayed. Often times sites have multiple data upload streams and this holding period allows us to properly identify if there is a problem at the device, data logger, or site level before notifying you. If a single device stops communicating, we would only want to notify you of that device-level communication issue. If all of the devices monitored by a single data logger stop communicating, we would want to notify you that there was an issue with the logger itself, rather than with every individual device it is responsible for monitoring. If a variety of devices across the 3 loggers stop communicating, we may want to notify you that there is a large-scale communication problem on your site that doesn't appear to be localized to a single upload stream. If all devices stop communicating, then we would want to notify you that there was a site-level outage rather than a large number of individual device communication issues.
- Communication, Down
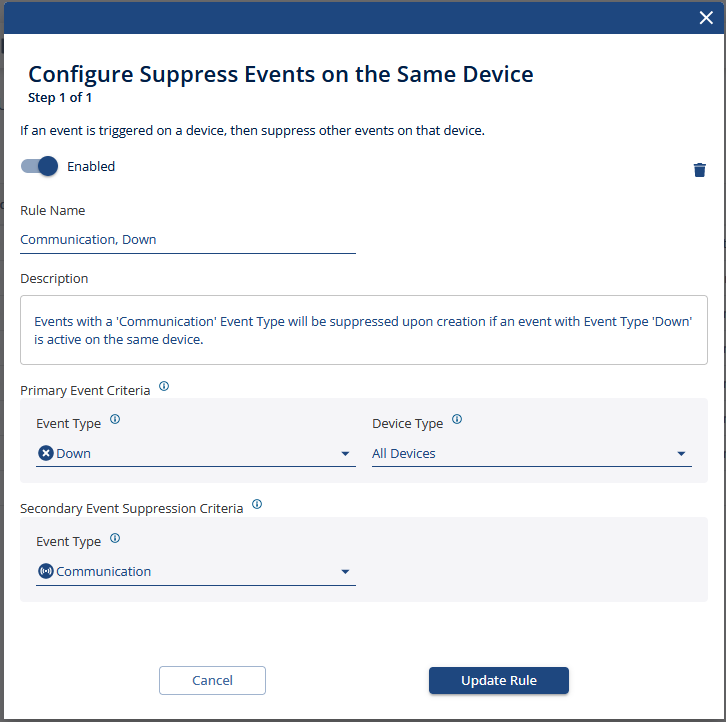
- This rule causes any device-level communication Events that occur to be suppressed while there is an active Down-type Event occurring on that same device. This usually only comes up when a device is failing and actively reports faults or errors for some time before it goes offline and we are no longer able to determine its operating status. Since a loss of communication indicates that we are unable to monitor a device but it may still be operating as expected otherwise, there is not necessarily any production impact associated with a communication outage. Down-type Events identify issues that do have implications on site production, so are generally treated as higher priority issues to resolve. As such, this rule treats the loss of communication to a device that's known to be in a fault/error state to be treated as a secondary concern relative to the more pressing need to restore the device's production capabilities, so it suppresses the communication Event.
- This rule causes any device-level communication Events that occur to be suppressed while there is an active Down-type Event occurring on that same device. This usually only comes up when a device is failing and actively reports faults or errors for some time before it goes offline and we are no longer able to determine its operating status. Since a loss of communication indicates that we are unable to monitor a device but it may still be operating as expected otherwise, there is not necessarily any production impact associated with a communication outage. Down-type Events identify issues that do have implications on site production, so are generally treated as higher priority issues to resolve. As such, this rule treats the loss of communication to a device that's known to be in a fault/error state to be treated as a secondary concern relative to the more pressing need to restore the device's production capabilities, so it suppresses the communication Event.
- Site Communication
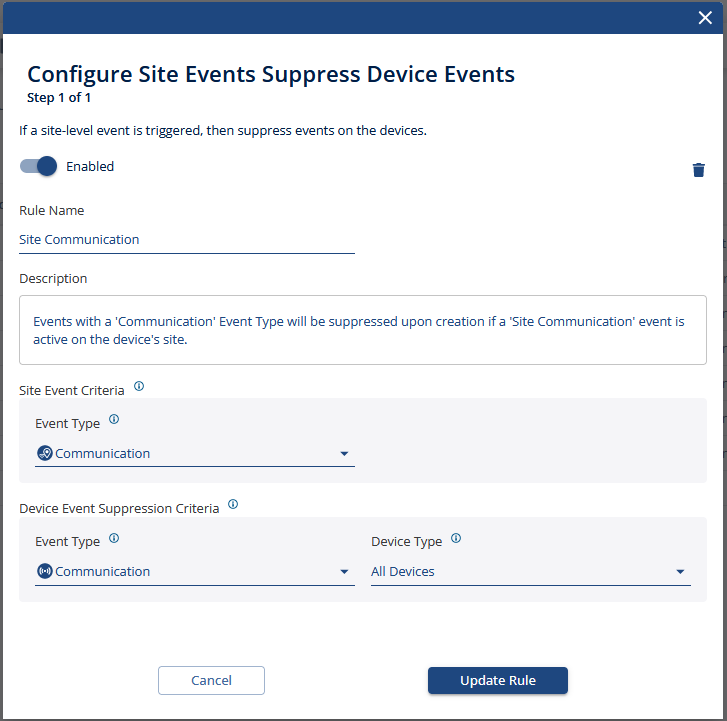
- This rule causes all device-level communication Events that are generated while there is an active Site Communication Event to be created in a suppressed state. This rule aims to prevent you from receiving a flood of notifications indicating that every individual device on a site has stopped communicating when we detect that the site as a whole has stopped uploading data to PowerTrack. Typically a Site Communication Event is only generated if 100% of the devices on a site have active communication Events. Once the site-level Event resolves and some devices on the site begin uploading once again, each individual device-level communication Event that was suppressed will be unsuppressed if it remains offline.
- This rule causes all device-level communication Events that are generated while there is an active Site Communication Event to be created in a suppressed state. This rule aims to prevent you from receiving a flood of notifications indicating that every individual device on a site has stopped communicating when we detect that the site as a whole has stopped uploading data to PowerTrack. Typically a Site Communication Event is only generated if 100% of the devices on a site have active communication Events. Once the site-level Event resolves and some devices on the site begin uploading once again, each individual device-level communication Event that was suppressed will be unsuppressed if it remains offline.
- Partial Site Communication
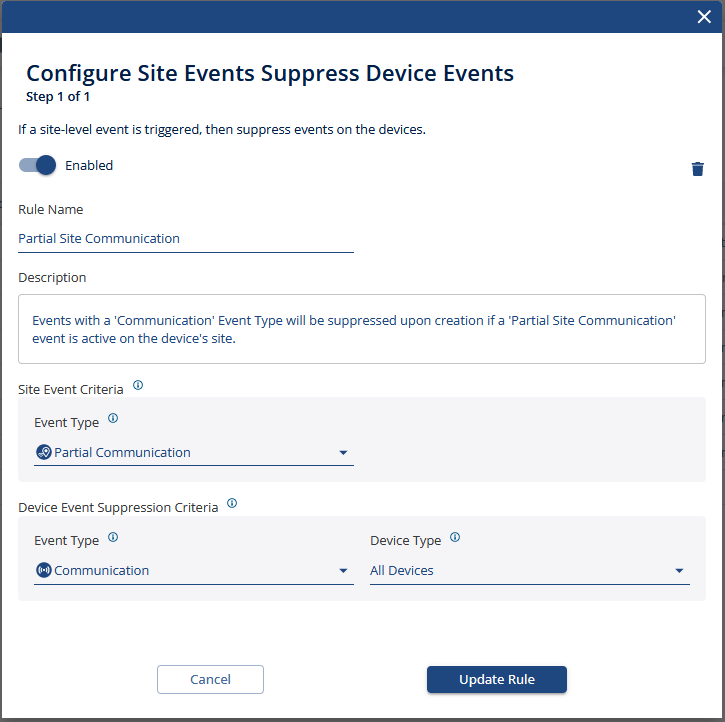
- This rule causes all device-level communication Events that are generated while there is an active Partial Site Communication Event to be created in a suppressed state. This rule aims to prevent you from receiving a flood of notifications indicating that every individual device on a site has stopped communicating when we detect that a significant portion of the site has stopped uploading data to PowerTrack. Once the site-level Partial Communication Event resolves and enough devices begin uploading once again, each individual device-level communication Event that was suppressed will be unsuppressed if it remains offline. The Partial Site Communication Event trigger is meant to be tuned to each customer's preferences based on the size of their sites and their tolerance for device-level communication Events, so it is recommended that you adjust the
Minimum Total Devices on SiteandMinimum % Devices Affectedparameters in the Event trigger configuration and leave this suppression rule enabled.
- This rule causes all device-level communication Events that are generated while there is an active Partial Site Communication Event to be created in a suppressed state. This rule aims to prevent you from receiving a flood of notifications indicating that every individual device on a site has stopped communicating when we detect that a significant portion of the site has stopped uploading data to PowerTrack. Once the site-level Partial Communication Event resolves and enough devices begin uploading once again, each individual device-level communication Event that was suppressed will be unsuppressed if it remains offline. The Partial Site Communication Event trigger is meant to be tuned to each customer's preferences based on the size of their sites and their tolerance for device-level communication Events, so it is recommended that you adjust the
- Data Logger Communication
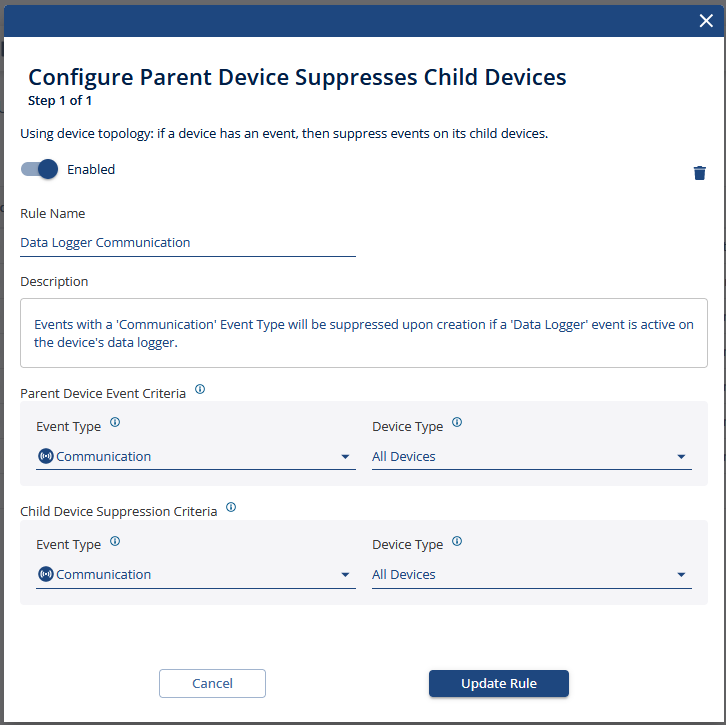
- This rule causes all device-level communication Events that are generated while there is an active communication Event on their associated data logger to be created in a suppressed state. This rule aims to prevent you from receiving a flood of notifications indicating that every individual device that a logger is monitoring has stopped communicating when we detect that the logger itself has stopped uploading data to PowerTrack. Once the communication Event on the data logger resolves, any device-level communication Events that were suppressed will be unsuppressed if those devices fail to start communicating.
- This rule causes all device-level communication Events that are generated while there is an active communication Event on their associated data logger to be created in a suppressed state. This rule aims to prevent you from receiving a flood of notifications indicating that every individual device that a logger is monitoring has stopped communicating when we detect that the logger itself has stopped uploading data to PowerTrack. Once the communication Event on the data logger resolves, any device-level communication Events that were suppressed will be unsuppressed if those devices fail to start communicating.
Creating a new Suppression Rule
While the default Suppression Rules should cover the majority of scenarios where multiple Events may be generated and help drive a high signal to noise ratio in your Event list, we also offer the ability for customers to create their own Suppression Rules. When you click the + Create Rule button in the Event Manager config section in PowerTrack, a series of modals will pop up to guide you through designing your new suppression rule. The section is geared towards helping you understand the specifics of your custom rule to make sure it properly suppresses Events when certain criteria are met.
- Navigate to the Site you wish to update using the Explorer. (In our case we’ll be navigating to the site
12MW Utility w/ String Inverters) - Click on the
Configtab at the top of the PowerTrack interface. - Click on the
Event Managersub tab at the top of the PowerTrack interface. - Click on the
Suppression Rulespage on the right side of the PowerTrack interface. - Click on the
+ Create Rulebutton above the table showing existing Suppression Rules.
- This will open a Suppression Rule creation wizard that will step you through each phase of defining a new rule, as detailed below:
- Choose Rule Type - Step 1 allows you to choose the category of rule that you are looking to create. These categories act as templates that determine which parameters you can adjust in the suppression logic, and govern when the rules get evaluated.
Site Events Suppress Device Events - This category is used to suppress new device-level Events if there is an existing site-level Event active when the device-level Event is being created. This can be useful for preventing a flood of notifications from each individual device when there is a larger site-wide problem that already captures and supersedes the device-level incidents. (Ex: If there is a Site Down Event active, then suppress any Inverter Down Events that are generated while the entire site is not producing.)
Parent Device Suppresses Child Devices - This category is used to suppress device-level Events that occur on one type of hardware when there is an active Event of the specified type present on another class of hardware. This can be useful for suppressing nuisance notifications on subsystem hardware when the overarching system is impacted. (Ex: If there is a Communication Event active on your gateway device, then suppress any Weather Station Communications Events until the data logger resumes uploading.)
Note: Since PowerTrack does not have a device hierarchy for most sites, only gateway devices (data loggers) can be selected as a parent device for any hardware that shares the same Gateway ID field as a child device.
Suppress Events on the Same Device - This category is used to suppress device-level Events of one type when there is an Active Event of another type already present on the same device. This can be useful for prioritizing higher impact Events whose resolution may cause the lower level impact Events to be resolved. (Ex: If there is an Inverter Down Event active, then suppress any Inverter Performance Events that are generated while the Inverter is Down.)
Suppress Minor Events - This category is used to suppress an entire class of Event Types for a site, if they are deemed to be unimportant for your operational management workflow. This can be useful if you are responsible for addressing Performance and Down issues for a site, but all Communication issues are contracted out to another party, or if you are not responsible for monitoring and actioning issues on a specific hardware class. (Ex: Suppress all Communication Events that are generated for Weather Station devices, as work on those devices is contracted out to another provider.)
Suppress Initial Duration - This category is used to delay notifications for a given Event type and hardware class, providing time for the Event to be triggered and resolved without ever leaving a suppressed state. This can be useful for keeping priority Events at the top of your work queue by allowing lower impact Events to remain suppressed and be resolved before they send a notification and appear on the events List page in the PowerTrack Event Manager. (Ex: Your NOC team watches suppressed Events and is expected to resolve low-impact events within 60 minutes of them occurring, so the Events List page can be used to track the Events that required additional time and effort beyond the standard response time.)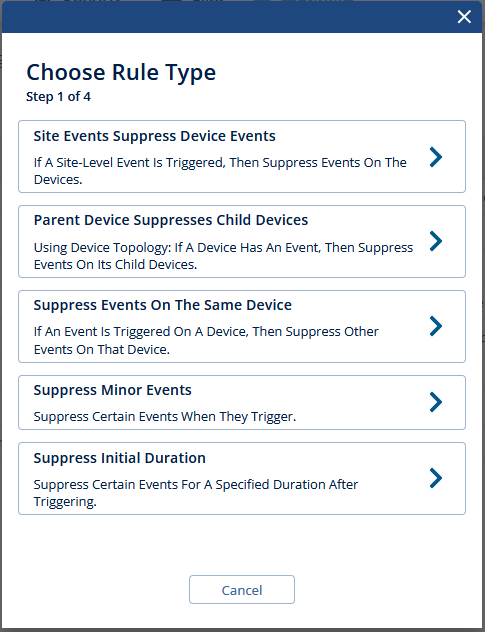
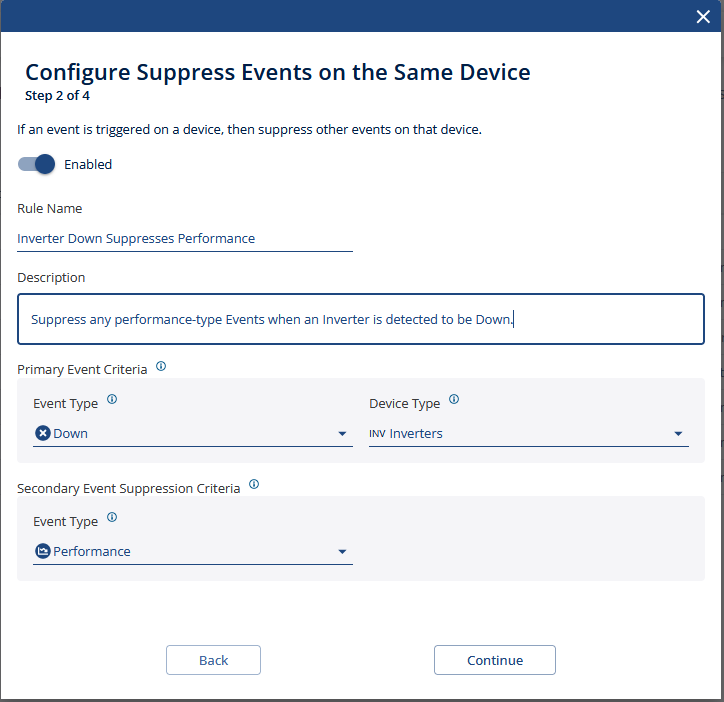
- Configure Rule - Step 2 allows you to declare and describe your new Suppression rule and specify the parameters that will be used to determine when it is enforced.
Enabled - Toggle this to enable/disable your new Suppression Rule once it is created.
Rule Name - String identifier for your new Suppression Rule.
Description - Field for you to describe the behavior and/or reasoning for the new Suppression Rule. Possibly a good place to add information on who is setting up the Suppression Rule and why.
Parameters - "Fill in the blank" style logic that allows you to choose what conditions must be present for the rule to be enforced. (In this case, we are creating a rule that will suppress any Performance-type Events that are generated on an Inverter that has an active Down-type Event present.)
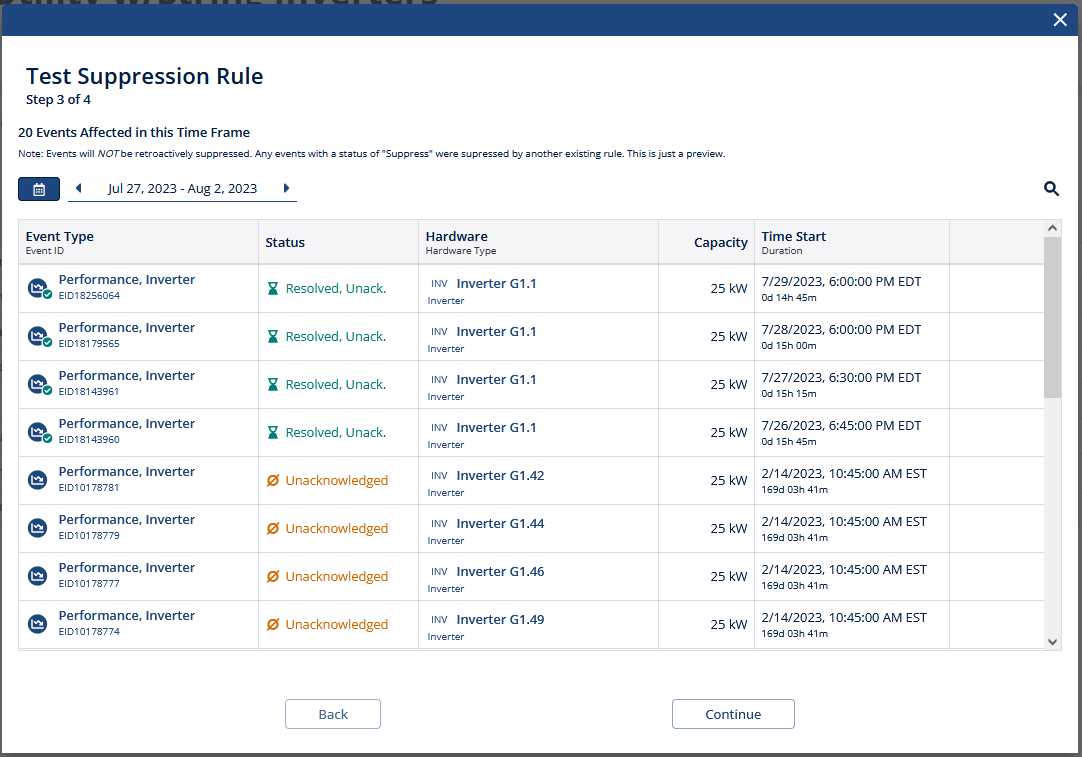
- Test Suppression Rule - Step 3 pulls up a sample of what Events would have been affected by the new rule that you have configured. It is important to note that these will not be retroactively suppressed, but this is a useful sanity check for determining if a specific scenario that has occurred on your site would have been caught by your new rule.
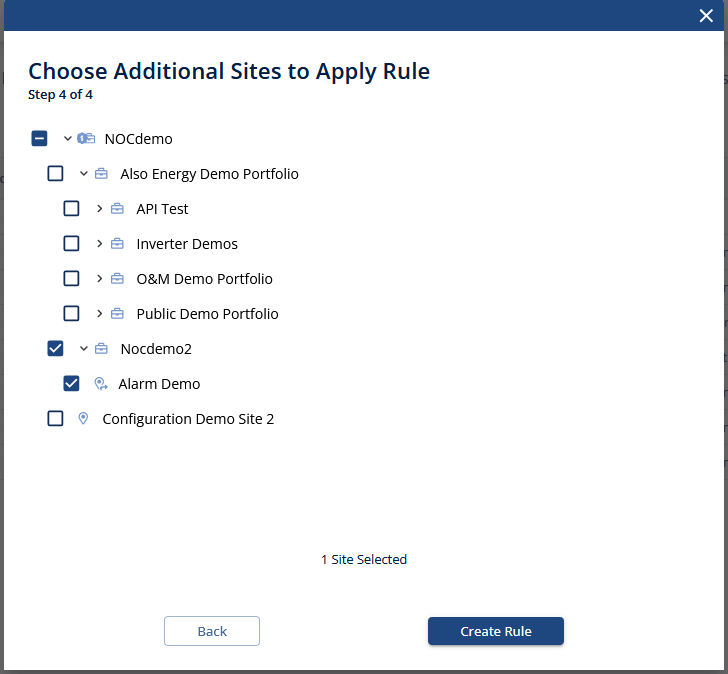
- Choose Additional Sites to Apply Rule - Step 4 allows you to create copies of this new Suppression Rue rule on other sites in your portfolio. Since Suppression Rules are managed on a site-by-site basis, this provides an easy way to make changes across a subset of sites or your entire portfolio or so that you do not need to visit each individual site and configure the rules separately if you are looking to enforce uniform behavior across the platform.
- Choose Rule Type - Step 1 allows you to choose the category of rule that you are looking to create. These categories act as templates that determine which parameters you can adjust in the suppression logic, and govern when the rules get evaluated.
Article Number: 2066
Author: Thu, Jul 27, 2023
Last Updated: Thu, Aug 3, 2023
Author: Mike Taylor
Online URL: https://kb.alsoenergy.com/article.php?id=2066